Sunday, May 29, 2011

A New Life Begins

This was just going to be a day for friends and family to come for a holiday BBQ.  The day started as usual until Jim came up from doing chores and said; "I think we're going to have a baby today".

We bred one of our maidens last year and sure enough she was in labor.

The alpaca in labor (Princess) is the one laying down and the one standing is her mother (Treasure).  Treasure stayed pretty close during the labor. 

We thought everything was progressing nicely when the nose started to appear.  This was also the time when our guests started arriving.  We were going to eat at about 1:00 but that sure didn't happen.

Poor Princess, she was up and then she was down.  In this picture, she is looking towards me as if asking for help.

Of course every minute seemed like an hour as we tried not to jump in and take over but after a certain amount of time passed we had no choice.

This is the first birth in 8 years that we had to help with and we hope we go another 8 without it happening again.


My husband ,Jim, had to slip in one hand to get the head and legs in the proper postion.  Once this happened we felt pretty sure every thing would be all right.  But again, Princess would get up and then lay back down.  


At this point, I called the vet. 

Baby was breathing fine but by now Princess would not even get up.  It seemed she just didn't know what to do and was exhausted.

 What seemed like hours later, but was really only about 20 minutes, the vet arrived.

Princess got up as soon as he showed up.  He always wears these green coveralls and I swear the animals know who he is. 
I was shocked when he pulled that chain out of the bucket of soapy water.  I thought what in the world was he going to do with that?    Jim said they sometime wrap the chain around the legs to help pull the baby out.   Luckily he didn't use it, just held it in his hands.


And then he was out........what a wonderful site to see!  A live, moving baby.


We love our vet.  Look at that smile on his face.  


Here he is all snuggled in the barn.  What a cutey!  Not one spot of white on that little body.

Now to come up with a name........

Friday, May 27, 2011

Fiber Arts Friday ~ Opinions needed

If you've read some of my previous posts, you know I'm crazy about beads.  Here are some pics of some new designs I've been working on for shawl pins. I plan on selling these at various shows I attend and am trying to make different sizes so they can be worn on any weight yarn.

So I thought I'd ask for some opinions on the different designs to see if I'm heading towards a positive outcome or if I'm wasting my time.

Dutch Spiral on knitting needle

It all got started when I took a class on making Dutch Spiral beads.  Then I showed the finished bead it to a friend who  thought it would make a cool shawl pin by placing it on a knitting needle.


Herbivore by Stephen West
Although this picture is not so great, at least it shows the pin in action to give you an idea of what it looks like when worn. 


Then I read an article in a beading magazine on flat peyote stitch and had to try this......

In the magazine they had hooked several of these triangles
together and made a bracelet.  So I thought why not try just making one and turn it into a shawl pin.


Then I thought if I can do a triangle could I do a square?  This was out of my comfort zone since there were no directions but I thought... what do I have to lose?   The square is a little wonky (not so stable) but hopefully someone will like that the corners point a little outward when worn.  This is why I'm asking your opinions!  Should I just stay with the triangle?

These designs turned out to be very light weight so they can be worn on any weight yarn.  One goal accomplished.

Then I had another friend say she really liked the Dutch Spiral bead a lot but the knitting needle was to long for her to wear comfortably.  Because of the weight of the finished bead, you really need the length of the needle to counter balance the shawl pin.  So for the last couple of weeks I've been trying to figure something out for her.

Yesterday I decided was the day to sit down and try to tackle this issue.  I've never worked with wire so this turned out to be quite an exercise in patience. Silly girl, why do I think I can just do this stuff with no help or training?   Now I can really appreciate the talent a jewelry maker has when working with wire.  After many failed attempts this is what I came up with.

Pretty basic, but it didn't take me long to realize I also might need to take a class in working with wire!  Since this only took me about 3 hours to make...what's a little time when your creating, I thought I'd give another style a try.

This one didn't take me as long because I  made so many mistakes on the first one
at least I learned what not to do.
Again, pretty plain but I thought it might look nice to have some wire showing to counter balance the bead.  Then because it's hard to know when to just walk
away...... I decided it might need a little decoration on the wire.

So I tried this....

I didn't want to take away from the Dutch spiral so I just twisted some wire along with 3 silver beads.

Now I'm not sure it was even worth the effort. Should I go with bigger wire and beads... leave well enough alone...?.I'm driving myself crazy with all the possibilities.

That's why I decided to make this my Fiber Arts Friday post.  Who better to ask than fellow artists?

So if you have the time to weigh in on these questions, I sure would like to hear your opinions.

Happy Fiber Arts Friday....hope everyone has a wonderful Memorial Day and I'd just like to thank all who have served our country!!!!!

Friday, May 20, 2011

Fiber Arts Friday ~ Alpaca boys go on summer vacation

Yep, that's right, nine of our boys have gone back this year to Mar-Rita Farms for loads of summer  fun. 

Last year our friend Rita asked if we would be willing to bring some of our boys to her farm for the summer.   Rita used to raise corridale sheep and has lovely pastures that she would have to mow unless she found some animals to keep it grazed. 
No grass, just mud thanks to all the rain this year.
On our farm, we have very little pasture and what we have goes to the girls.  This leaves the boys out in the cold as far as grass is concerned.  So believe me it didn't take us long to say YES.  Rita enjoyed having the boys so much she asked if they could come back this year.  What a win, win situation for everyone.

So this Wednesday we got the boys around for their summer vacation. 


You can't tell me animals aren't smart.  They knew as soon as Jim pulled the trailer up to the barn something was up.   Look at Johnny Cash taking his last look at the girls before heading out.


Here's pic's of  Mar Rita Farms. It is such a beautiful location and Rita even has her own farm store.  Look at all that grass!  


So on Thursday morning as I was looking out of our family room this is what I saw.  Not the lovely pastures at Mar-Rita's but a birds eye view of our beautiful woods.  The different colors of green were stunning first thing in the morning and inspired me to do some dying. 


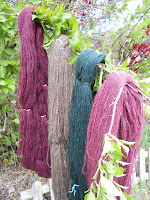
I have some yarn that I had made that I'm not so crazy about.  I dyed some merino a teal color and wanted it mixed with some brown.  I wanted it to be more teal than brown but the mill and I had a communication problem and they added to much brown.  The yarn turned out to be an usual oatmeal brown color.  So I decided to over dye it to see what would happen. 


The picture on the left shows the oatmeal brown yarn that I over dyed using a hot pink color.  It came out a really nice light raspberry color.  So I thought what would happen if I used my raspberry dye...... it turned out a really rich darker raspberry color shown in the picture on the right.  What fun, the two colors would be wonderful used together. 

raspberry and hot pink

Then I thought I'd try a green since it was the green of our woods that inspired me to try over dying in the first place.


I used emerald dye and the yarn turned out to be a really deep emerald color.  It is truly stunning. This picture really doesn't do it justice.

Now I may have to find a project that I can use all the colors along with the oatmeal brown I started out with.

So tomorrow I my try some different colors ....  Aztec Gold, Brilliant Blue or Key Lime.  Any suggestions?

Wishing everyone a Happy Fiber Arts Friday!!!!

Friday, May 6, 2011

Fiber Arts Friday ~ Cabachon Jewelry

Cabachons.......Mmmmmmm I just love Cabachons!

Once I had pretty much mastered pin weaving shawl pins, shown in an earlier post, I decided to move on to creating shawl pins with my new love, cabachons.

This time I found inspirational books at our local JoAnn Fabrics store.  My favorite for basic instruction is Beading with Cabochons.  This book is clearly written with excellent photos as well as illustrations and step by step directions. 

Here is a pic of my first 3 projects using the techniques in Beading with Cabochons.


Then I found The Art of Bead Embroidery. This book opened my eyes to design and what could be done once I understood the basics.

What a difference....

For the pin on the left, I used a Dalmatian Jasper cabochon and for the pins on the right I used Lapis Lazuli cabs.  Size 15 seed beads fill in the back grounds.


My husband and I attend the Wheatland Music Festival every year. Unfortunately it rained pretty much all day on Saturday so I spent the day under the easy up designing and creating this shawl pin I named "Happy Wheatland".  It's a little funky, but that's what Wheatland is all about.

I did get my wash cloth/towels completed.  This is the first time I've used cotton and boy was that an experience.  Of course I hadn't used my loom for about a year so I had some major tension issues from my not so good warping job. 

The wash cloth on the left is just plain weave and it turned out the best. In fact, it actually turned out to be about the size I thought it would be when I started this project.

I'm part of a weaving study group that meets once a month and we are trying new techniques from The Weavers Idea Book.  In the cloth on the right, I was using the loop method to add texture.  This cloth came out smaller than the plain weave once it was washed and dried. 

Because I did such a bad job of warping, I decided I just needed to get to the end of the warp so I decided to make little hand towels.

For the towel on the left I used the clasped weave technique.  I don't know what I did wrong because even holding the towel closely, you can hardly see I used green, peach, and tan.  For the towel on the right I used a pick up stick and tried my hand at a 3/l weft float.  Again you can hardly see the end result.  But the goal was to learn different techniques and I did accomplished that.  I also hem stitched all the ends so I have that technique learned as well.

Although I was very disappointed in the fact that you couldn't really see the colors I wove with, I do love the feel of the finished pieces.  I look at this as good practice and a learning experience.

Yesterday I warped my loom for a scarf using yarn from our alpacas and a brushed mohair.  Yes I know, the bruched mohair is sticky but I only used a small amount and I think it adds a nice touch with my suri yarn. 

,I'm weaving 1" of plain weave, inserting a 1 1/2" spacer, weaving 1" and so on.  We'll see how it goes.

It going to be a lot of hemstitching so I should get that technique down pat.  In the picture, the top spacer has been removed leaving just 1 1/2" of warp and the second spacer is still inserted.  I've just gotten started and already want to see the finished project!

So with that being said it's off to the loom for me.  Of course I will have to read everyone's Fiber Art's Friday blogs first.  My wonderful husband has decided I can take Friday's off from chores so I can blog and check out all your blogs. What a guy!

Happy Fiber Art's Friday!


Sunday, May 1, 2011

Gentlemen Start Your Engines!!

I hear this statement often at this time of year but on Saturday night it took on a whole new meaning as Jim took part in his own race.   Racing?  Yep, go cart racing. 
Buckle up, safety first
Jim & Mike (pit crew)

And he's off.............


Just getting into position.  Last to arrive you ask?  Of course, we are talking about Jim after all.  Hammer down........

 
Wow, there's Jim at the front 

These are the racers running the first heat to see who will make it into the main feature.  The anticipation was immense for me and our friends watching from the side lines.  We yelled and cheered Jim on but then the unexpected happened and he was suddenly at the back of the pack.  We found ourselves speculating on what the problem could be.  Was he okay, just being cautious or was he having mechanical problems?

As it turned out, it was mechanical problems.  The throttle was stuck half open.  So between heats they went into action and fixed the problem.


Unfortunely, Jim didn't make it into the main event but he was not deterred.  He quickly stepped into the roll of flagman.

 
Here is a pic of Jim with a local fan between heats....


And a picture of Jim's last heat of the night.....


Then it was time to celebrate.  No crashes, no yellow flags and all laps completed. 


What is that beverage Jim is drinking?  Champagne, yes champagne!  Brought by Shelley so Jim could celebrate his first race of the season.  


Picture of Jim with his loyal supporters

 Mike, Shelley, Jim and Nancee

Not pictured is Dave and of course me, the new budding photographer.  Jim would like to give a big thanks to Bryce for his outstanding mechanical work and to Choppy for allowing him to race.

A good time was had by all!